My LS1 v8 engine came in a few nights ago. It will replace the v6 that's in the Camaro now. It'll be a lot of work, but I'll learn a ton and I know I'll have a blast building a muscle car.
I'm going to section each part of the build as separate posts so that things will be clearer. I'm doing things carefully and step-by-step, so that's how the LS1 blog posts will be.
It's all about learning so I hope you guys learn a few things while I go through the process of building a car. :)
Showing posts with label LS1 for 93 Camaro. Show all posts
Showing posts with label LS1 for 93 Camaro. Show all posts
LS1 - Part 1: Getting the engine onto an engine stand
The motor came off of a truck and was sitting on a shallow crate.


I could have worked on it from there, but it would be easier to work with it on an engine stand. I bought one from Advance Auto Parts for about $40.
My good buddy Carl had an engine hoist so that we could lift the motor onto the engine stand.
To lift a motor by a hoist, the first thing you need to do is find the screw holes on the outside of the heads as indicated in the pics. The bolts I used were 3/8 course thread and I got them at Ace Hardware. You want to get Grade 8 bolts. The engine hoist chain will go through this bolt, and one cattycorner on the other side of the motor.
 Then you put one of the chain links through the bolt, and then do it on the other side. Keep in mind though, that the stress of the chain up against the valve cover or head when it's hoisted into the air might scratch the valve cover/head. So it's a good idea to have a rag or towel in between the chain and the metal it would scratch, to protect the valve cover/head surface.

Then make sure that the chain is fastened securely. Here we used a Grade 8 bolt and nut (3/8" inch again).
 The next step is to hoist the engine up into the air. On Carl's engine hoist, there was a lever you jacked up and down to lift it, and a dial that rotated to let the engine back down gently.

 The next step is to attach the engine stand onto the motor. The engine stand comes in two parts really - one part is the part that bolts to the back of the engine, and the other part is the stand. In the pic below you'll see the first part being bolted to the back of the motor, with bolts going through bolt holes where the transmission would bolt to. The bolts going into the motor (the ones that have arrows pointing to them in the pic below) should screw in about half an inch to an inch into the motor. Notice we used washers and nuts to give it more stability:
 Make sure the bolt connections are really secure. Here I'm using two wrenches to tighten all the bolts:
 The next thing to do is to attach the second part of the engine stand, the stand part. Slide it onto the first part of the engine stand attached to the motor, and be sure to stick in the engine stand pin (indicated by the arrow in the pic below):
 Then you just lower the engine hoist so that the stand rests on the ground. Here you can see me using a pair of pliers to turn the dial on the engine hoist to lower it:
 And now that the stand is on ground, the engine will be stomach to chest height, so it will be much easier to work on!
Now the teardown begins, so the next part will be about removing the throttle body.


I could have worked on it from there, but it would be easier to work with it on an engine stand. I bought one from Advance Auto Parts for about $40.
My good buddy Carl had an engine hoist so that we could lift the motor onto the engine stand.
To lift a motor by a hoist, the first thing you need to do is find the screw holes on the outside of the heads as indicated in the pics. The bolts I used were 3/8 course thread and I got them at Ace Hardware. You want to get Grade 8 bolts. The engine hoist chain will go through this bolt, and one cattycorner on the other side of the motor.
 Then you put one of the chain links through the bolt, and then do it on the other side. Keep in mind though, that the stress of the chain up against the valve cover or head when it's hoisted into the air might scratch the valve cover/head. So it's a good idea to have a rag or towel in between the chain and the metal it would scratch, to protect the valve cover/head surface.
Then make sure that the chain is fastened securely. Here we used a Grade 8 bolt and nut (3/8" inch again).
 The next step is to hoist the engine up into the air. On Carl's engine hoist, there was a lever you jacked up and down to lift it, and a dial that rotated to let the engine back down gently.
 The next step is to attach the engine stand onto the motor. The engine stand comes in two parts really - one part is the part that bolts to the back of the engine, and the other part is the stand. In the pic below you'll see the first part being bolted to the back of the motor, with bolts going through bolt holes where the transmission would bolt to. The bolts going into the motor (the ones that have arrows pointing to them in the pic below) should screw in about half an inch to an inch into the motor. Notice we used washers and nuts to give it more stability:
 Make sure the bolt connections are really secure. Here I'm using two wrenches to tighten all the bolts:
 The next thing to do is to attach the second part of the engine stand, the stand part. Slide it onto the first part of the engine stand attached to the motor, and be sure to stick in the engine stand pin (indicated by the arrow in the pic below):
 Then you just lower the engine hoist so that the stand rests on the ground. Here you can see me using a pair of pliers to turn the dial on the engine hoist to lower it:
 And now that the stand is on ground, the engine will be stomach to chest height, so it will be much easier to work on!
Now the teardown begins, so the next part will be about removing the throttle body.
LS1 - Part 2: Throttle Body Removal
The first part of the motor I wanted to bolt off was the throttle body. I figured it wouldn't be very hard to do, and would get my confidence rolling for the rest of the motor. The removal was very easy to do. Here's what the throttle body looks like:

I needed a socket set that was tougher and more diverse than my beginner socket set, so I went to Sears Hardware and got this for about $100:
 The throttle body was held on by three bolts:
 I went through the socket set and tried different sockets to see which one would fit. The one that fit was 10mm.
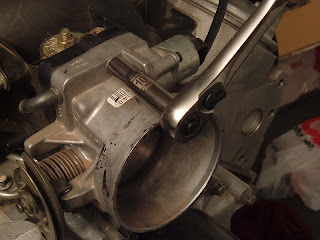 After unbolting the last bolt, the throttle body came right off. Next thing to come off will be the intake plenum.

I needed a socket set that was tougher and more diverse than my beginner socket set, so I went to Sears Hardware and got this for about $100:
 The throttle body was held on by three bolts:
 I went through the socket set and tried different sockets to see which one would fit. The one that fit was 10mm.
 After unbolting the last bolt, the throttle body came right off. Next thing to come off will be the intake plenum.
LS1 - Part 3: Intake Plenum Removal
To remove the intake plenum, use your 10mm socket to remove the bolts along the sides of the fuel rails that hold it down, indicated by the red arrows in the pic below. Use the 10mm socket for the bolts indicated by the fingers in the pic below too.
 Once those are unbolted, just lift the intake plenum right off:
 Once the intake plenum is off, this is what you will see:
 Pop off the black circular pads that are in the center of the intake valley plate, and you'll see the knock sensors in there.
 You'll see that the sensors are held on by a clip (as indicated by the white arrow in the first pic below). Just pull them forward a little and off with your fingers.

 Remove the assembly the knock sensors and the black caps are a part of and move them out of the way. Now if you look down into each of the knock sensor holes, you'll find a big bolt in each hole.
 These bolts are holding down the intake valley plate. To unbolt them, I had to go to Sears Hardware and get a 12 point 22mm socket. It cost about $13. Then I unbolted them:
 After that I thought the intake valley plate would be attached by a gasket or some sealant, so I grabbed my gasket scraper, which I got from Goodson for $7. You can see the part number on the plastic bag in the pic below.
 I just stuck it in between the plate and jimmied it around to get the plate off.
 Once it was detached, I just lifted the plate right off.

You can now see the camshaft. :) Next I'll talk about how to remove the coil pack assemblies and the valve covers.
 Once those are unbolted, just lift the intake plenum right off:
 Once the intake plenum is off, this is what you will see:
 Pop off the black circular pads that are in the center of the intake valley plate, and you'll see the knock sensors in there.
 You'll see that the sensors are held on by a clip (as indicated by the white arrow in the first pic below). Just pull them forward a little and off with your fingers.
 Remove the assembly the knock sensors and the black caps are a part of and move them out of the way. Now if you look down into each of the knock sensor holes, you'll find a big bolt in each hole.
 These bolts are holding down the intake valley plate. To unbolt them, I had to go to Sears Hardware and get a 12 point 22mm socket. It cost about $13. Then I unbolted them:
 After that I thought the intake valley plate would be attached by a gasket or some sealant, so I grabbed my gasket scraper, which I got from Goodson for $7. You can see the part number on the plastic bag in the pic below.
 I just stuck it in between the plate and jimmied it around to get the plate off.
 Once it was detached, I just lifted the plate right off.
You can now see the camshaft. :) Next I'll talk about how to remove the coil pack assemblies and the valve covers.
LS1 - Part 4: Coil Pack Assemblies and Valve Covers Removal
To remove the coil pack assemblies, use a 10mm socket to unscrew the screws that are holding it down to the valve cover (circled in red in the pic below). You do NOT have to remove the other screws (circled in white in the pic below). these hold the individual coil packs to the assembly.
 Set the coil packs aside and label them "PASSENGER SIDE" or "DRIVER SIDE." Then remove the four screws holding down a valve cover with an 8mm socket:
 Then just pull the valve cover right off, and do the same for the other side. Label these "DRIVER SIDE" and "PASSENGER SIDE" accordingly also. When those are off, you will see the rocker arms, the pushrods, and the valve springs. This is what they look like:


 Next I'll talk about removing the rocker arms and pushrods.
 Set the coil packs aside and label them "PASSENGER SIDE" or "DRIVER SIDE." Then remove the four screws holding down a valve cover with an 8mm socket:
 Then just pull the valve cover right off, and do the same for the other side. Label these "DRIVER SIDE" and "PASSENGER SIDE" accordingly also. When those are off, you will see the rocker arms, the pushrods, and the valve springs. This is what they look like:

 Next I'll talk about removing the rocker arms and pushrods.
LS1 - Part 5: Rocker Arms and Pushrods Removal
Before you remove the rocker arms and pushrods, make sure you have a good rocker arm/pushrod/valvetrain organizer. You can see the one I got from Goodson in the pic below. The item number is VTO-80.
A word of caution before you begin: be very organized and careful; when you put the rocker arms and pushrods in the organizer tray, make sure they match up to where you removed them. If you don't, you risk damage to the motor when you reinstall them.
Remove the rocker arms with an 8mm socket and put them into the tray:
 After the rocker arms are out, you will see the pushrods, indicated by red arrows in the pic below:
 Here is what the tray will look like when you're done:
 My pushrods had information on them:
 My buddy Carl said that according to the info written on my pushrods, I've got really good pushrods that are very strong. Cool. :)
Next I'll talk about removing the water pump and the oil dipstick.
A word of caution before you begin: be very organized and careful; when you put the rocker arms and pushrods in the organizer tray, make sure they match up to where you removed them. If you don't, you risk damage to the motor when you reinstall them.
Remove the rocker arms with an 8mm socket and put them into the tray:
 After the rocker arms are out, you will see the pushrods, indicated by red arrows in the pic below:
 Here is what the tray will look like when you're done:
 My pushrods had information on them:
 My buddy Carl said that according to the info written on my pushrods, I've got really good pushrods that are very strong. Cool. :)
Next I'll talk about removing the water pump and the oil dipstick.
LS1 - Part 6: Water Pump and Oil Dipstick Removal
All I needed to do to remove the water pump was to use a 10mm socket on these bolts:
 After those bolts were removed, I just pulled it right off:
 Be careful when you pull it off though, you might drop one of these:
 Those are water pump gaskets. There's one on each side, so be sure to label them correctly and remember how they go on.
To remove the oil dipstick, first remove the oil dipstick bracket bolt:
 Then, just pull the dipstick tube straight up and out.
Next I'll talk about removing the heads.
 After those bolts were removed, I just pulled it right off:
 Be careful when you pull it off though, you might drop one of these:
 Those are water pump gaskets. There's one on each side, so be sure to label them correctly and remember how they go on.
To remove the oil dipstick, first remove the oil dipstick bracket bolt:
 Then, just pull the dipstick tube straight up and out.
Next I'll talk about removing the heads.
LS1 - Part 7: Heads Removal
Below is a pic of the heads and the bolts I had to take off to get the head off of the engine. The top bolts (circled in red) were 10mm bolts and the middle bolts (in green) were 15mm bolts. The things the red arrows are pointing at are spark plugs.
 Before I started removing the bolts, I took the spark plugs off. I used this tool, which is a 5/8 socket, but a special 5/8 just for spark plugs. You'll see that it says FOR SPARK PLUG USE ONLY on it:
 To remove the middle bolts, I had to use an extension along with the 15mm socket:

Once all the bolts are removed, just find some openings on each end of the head and pull it off:
 Be careful, they might be heavy. Mine are aluminum heads so they're not heavy at all, but cast iron heads are pretty heavy.
So here's where I'm at with the motor:
 Next I'll talk about removing the harmonic balancer.
 Before I started removing the bolts, I took the spark plugs off. I used this tool, which is a 5/8 socket, but a special 5/8 just for spark plugs. You'll see that it says FOR SPARK PLUG USE ONLY on it:
 To remove the middle bolts, I had to use an extension along with the 15mm socket:
Once all the bolts are removed, just find some openings on each end of the head and pull it off:
 Be careful, they might be heavy. Mine are aluminum heads so they're not heavy at all, but cast iron heads are pretty heavy.
So here's where I'm at with the motor:
 Next I'll talk about removing the harmonic balancer.
LS1 - Part 8: Harmonic Balancer Removal
Ok, this was a bit tricky. I also forgot to take some pics so I had to use some old pics, but hopefully you guys will get it.
In order to remove the harmonic balancer, I had to remove this bolt:
 That bolt is on there so tight that you will need an air compressor and an air ratchet gun to get it off. My buddy Crazy Cool Carl came over with his air compressor:
 I think this was a 3 and a half horsepower air compressor that he got at Harbor Freight. We plugged it into an extension cord, let it run til it was "warmed up." It was pretty loud warming up. When the loud noise stops, that's when you know it's done warming up. We then hooked up an air ratchet gun to it. The crankshaft pulley bolt is a 15/16 bolt, so we put a 15/16 socket on the end of the air ratchet gun. Carl put the gun/socket on the bolt and pulled the trigger, and it came off in a second. AWESOME.
Then we had to get one of these harmonic balancer removal kits:
 We went to Advance Auto because they have a "tool borrow policy" where you pay for the tool, but if you bring it back the next day, they refund you 100% of the money. Great for when you only need to use a specific tool occasionally.
You'll notice in the kit that it has a few parts — some bolts, some nuts, a "crow's foot," a pushrod or two, and a clamp bracket thing. In the first pic below you can see that in one end of the crow's foot, we put in one of the pushrods (indicated by the red arrow), and in the other end, we screwed in the nut and bolt (indicated by the white arrow). We also had to stick in a pretty long bolt into the end of the crank so that the pushrod had something to push against (this is shown the second pic below. You'll notice that the harmonic balancer is already off in this pic. This is so you can see this step easier.)

 Now what we had to do is get the end of the pushrod to butt up against the bolt in the second pic above, take the three claws of the crow's foot and make them grab onto the three prongs of the harmonic balancer:
 Once they're grabbed on, attach a 3/4 inch socket and a socket wrench to the crow's foot:
 Turn it slowly but steadily. The crow's foot will start to pull the harmonic balancer off! You will know it's working when you start seeing this stripe of metal:
 Just keep turning and turning, and it will eventually come off:
 Next I will talk about removing the oil pan.
In order to remove the harmonic balancer, I had to remove this bolt:
 That bolt is on there so tight that you will need an air compressor and an air ratchet gun to get it off. My buddy Crazy Cool Carl came over with his air compressor:
 I think this was a 3 and a half horsepower air compressor that he got at Harbor Freight. We plugged it into an extension cord, let it run til it was "warmed up." It was pretty loud warming up. When the loud noise stops, that's when you know it's done warming up. We then hooked up an air ratchet gun to it. The crankshaft pulley bolt is a 15/16 bolt, so we put a 15/16 socket on the end of the air ratchet gun. Carl put the gun/socket on the bolt and pulled the trigger, and it came off in a second. AWESOME.
Then we had to get one of these harmonic balancer removal kits:
 We went to Advance Auto because they have a "tool borrow policy" where you pay for the tool, but if you bring it back the next day, they refund you 100% of the money. Great for when you only need to use a specific tool occasionally.
You'll notice in the kit that it has a few parts — some bolts, some nuts, a "crow's foot," a pushrod or two, and a clamp bracket thing. In the first pic below you can see that in one end of the crow's foot, we put in one of the pushrods (indicated by the red arrow), and in the other end, we screwed in the nut and bolt (indicated by the white arrow). We also had to stick in a pretty long bolt into the end of the crank so that the pushrod had something to push against (this is shown the second pic below. You'll notice that the harmonic balancer is already off in this pic. This is so you can see this step easier.)

 Now what we had to do is get the end of the pushrod to butt up against the bolt in the second pic above, take the three claws of the crow's foot and make them grab onto the three prongs of the harmonic balancer:
 Once they're grabbed on, attach a 3/4 inch socket and a socket wrench to the crow's foot:
 Turn it slowly but steadily. The crow's foot will start to pull the harmonic balancer off! You will know it's working when you start seeing this stripe of metal:
 Just keep turning and turning, and it will eventually come off:
 Next I will talk about removing the oil pan.
Subscribe to:
Posts (Atom)